Bringing the Christmas Winter Wonderland Shadow Box to Life: A Maker's Guide to Layered Holiday Decor
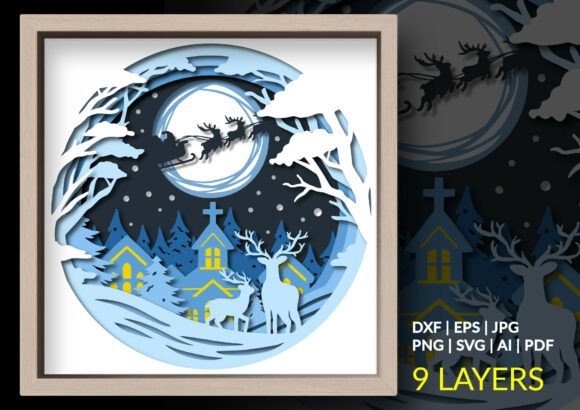
The holiday season often demands a balance between professional obligations and the desire to create meaningful, personal traditions. For creators, small business owners, and hobbyists alike, the Christmas Winter Wonderland Shadow Box represents more than just a decorative item; it is a structured project that fits seamlessly into a broader workflow of seasonal planning and execution. This premium 9-layer design, depicting Santa Claus and his reindeer soaring across a giant glowing moon above a peaceful snow-covered village, offers a tangible way to engage with the festive spirit through a process-oriented approach.
Integrating this layered papercut file into your routine requires an understanding of digital asset management, machine compatibility, and assembly logistics. Whether you are producing handmade gifts for clients, stocking an Etsy shop, or simply organizing a family crafting weekend, the success of the final product depends on how well you manage the phases before, during, and after the cut.
Pre-Production Planning and Asset Selection
Before sending any data to a cutting machine, the preparation phase is critical. The Christmas Winter Wonderland Shadow Box comes as a comprehensive package containing SVG, DXF, EPS, AI, PNG, and PDF files. Selecting the correct format is the first decision in your workflow and dictates the efficiency of the subsequent steps.
For users operating within the Cricut ecosystem or Adobe Suite, the SVG file is the optimal choice. It preserves layer integrity, allowing you to manipulate individual elements like the church, the trees, or the moon without losing vector quality. Silhouette users running the free version of the software should prioritize the DXF file, which ensures compatibility while maintaining the necessary cut paths. Those requiring advanced customization for commercial scaling might prefer the AI or EPS files to adjust anchor points or modify the design structure in Illustrator or Inkscape.
Effective preparation also involves material sourcing. To achieve the "enchanting 3D atmosphere" described in the design specifications, material consistency is key. You will need nine distinct layers of cardstock. Professionals often recommend using 65lb to 80lb cardstock for structural rigidity, ensuring the layers stand apart without warping. Before committing to the final materials, run a test cut on a single layer using the provided PNG file for visual reference or a single vector layer to verify blade depth and pressure settings. This quality control step prevents material waste and ensures the intricate details of the snow-covered village cut cleanly.
Execution: Cutting and Organization
Once the digital files are loaded and materials are prepped, the execution phase begins. This stage interacts directly with your hardware capabilities. Machines like the Cricut Explore, Silhouette Cameo, or laser cutters each have specific nuances when handling complex, multi-layer designs. The Christmas Winter Wonderland Shadow Box is optimized for clean cutting, but the density of the details—such as the reindeer antlers or the church steeple—requires precise calibration.
Organization during the cutting process is vital for workflow efficiency. As each of the nine layers is cut, label them immediately. A common bottleneck in layered projects is the confusion that arises when similar-looking layers are mixed up. Use the PDF guide included in the package as a reference map. Some creators find it helpful to stack the cut layers in reverse order (bottom layer on the bottom) as they come off the mat. This simple habit streamlines the assembly phase, reducing the cognitive load required to reconstruct the scene later.
If you are managing this project for a small business or a high-volume production run, consider batching your cuts. Cut all background layers for multiple units first, then move to the mid-ground elements, and finish with the foreground details. This method minimizes material changes and tool adjustments, significantly improving throughput.
Assembly and Depth Construction
The assembly phase is where the Christmas Winter Wonderland Shadow Box transforms from a collection of paper shapes into a cohesive narrative scene. This is the most time-intensive part of the process and requires patience and precision. The goal is to create a beautiful sense of depth that mimics a three-dimensional environment.
To achieve the intended 3D effect, you must use spacers between each layer. Foam adhesive squares are the industry standard for this application, typically ranging from 1mm to 3mm in thickness. The choice of spacer thickness impacts the final aesthetic; thicker spacers create dramatic shadows and a deeper perspective, while thinner spacers offer a subtler relief. For the glowing moon effect mentioned in the design, ensure that the layers surrounding the moon are spaced consistently to allow light to pass through evenly if you plan to add LED backlighting.
Start assembly from the back layer forward. Secure the rearmost layer (usually the sky or distant mountains) to the base of the shadow box frame. Apply spacers to the next layer and align it carefully using the registration marks or visual cues from the design. Press firmly to ensure adhesion but avoid crushing the foam spacers, which would reduce the depth effect. Continue this process layer by layer until you reach the foreground elements, such as Santa and his sleigh.
During assembly, maintain a clean workspace. Dust or adhesive residue on the visible surfaces can detract from the professional finish. Keep a soft brush or compressed air nearby to clear debris between layers. If you encounter minor imperfections in the cut, such as small tabs left behind, use a sharp craft knife to clean them up before adhering the layer. This attention to detail is what separates a amateur craft from a market-ready product.
Integration into Broader Workflows
The utility of the Christmas Winter Wonderland Shadow Box extends beyond the immediate act of crafting. For educators, this project serves as an excellent module for teaching spatial reasoning, sequencing, and fine motor skills. The clear separation of layers allows students to understand the concept of foreground and background in a tactile way.
For marketers and content creators, the assembly process itself offers valuable content opportunities. Documenting the transition from digital file to physical object provides engaging material for social media channels, blogs, or email newsletters. Time-lapse videos of the layering process or tutorials on selecting the right cardstock colors can drive engagement and establish authority in the DIY niche.
Small business owners can integrate this design into their Q4 product lines. Because the file includes multiple formats, it offers flexibility for different production methods. You might produce assembled shadow boxes for direct sale while also selling the digital files to other makers who prefer to cut their own. This dual-revenue stream maximizes the value of the initial asset purchase. Furthermore, the nostalgic theme appeals to a wide demographic, making it a versatile addition to holiday catalogs.
Long-Term Maintenance and Display
Once assembled, the longevity of your Christmas Winter Wonderland Shadow Box depends on environmental factors and display choices. Paper is susceptible to humidity and direct sunlight, which can cause fading or warping over time. To preserve the quality of the piece, display it in a climate-controlled environment away from windows with intense UV exposure.
If you intend to reuse the design in future seasons, consider the framing method. Using a shadow box frame with a removable back allows you to disassemble the layers for flat storage if necessary, though this is rarely recommended due to the risk of damaging the adhesive or the paper. A more practical approach for long-term use is to seal the frame tightly upon completion to prevent dust accumulation inside the layers. Dusting the exterior glass annually is usually sufficient to keep the scene looking pristine.
For those interested in enhancing the project, adding lighting elements can elevate the experience. Battery-operated LED strips placed along the inner edges of the frame can illuminate the glowing moon and cast dynamic shadows across the village. When integrating electronics, ensure that wires are concealed behind the layers or within the frame channel to maintain the clean aesthetic of the papercut design.
Conclusion
The Christmas Winter Wonderland Shadow Box is a testament to the power of structured creativity. By approaching the project with a focus on preparation, precise execution, and thoughtful assembly, you can transform a digital file into a cherished holiday tradition. Whether used for personal decoration, educational purposes, or commercial production, the 9-layer design offers a robust platform for exploring the intersection of technology and handmade artistry. With the right tools and a systematic workflow, the magic of a snowy Christmas Eve can be captured and preserved in stunning 3D detail.