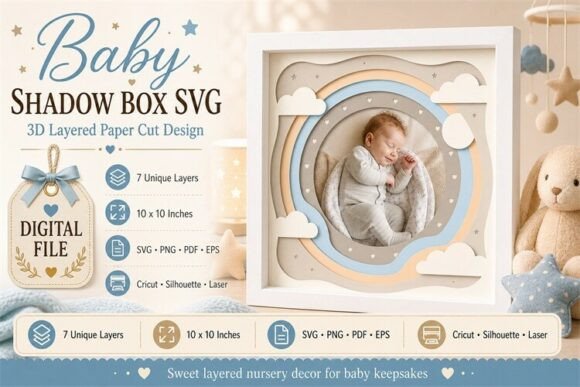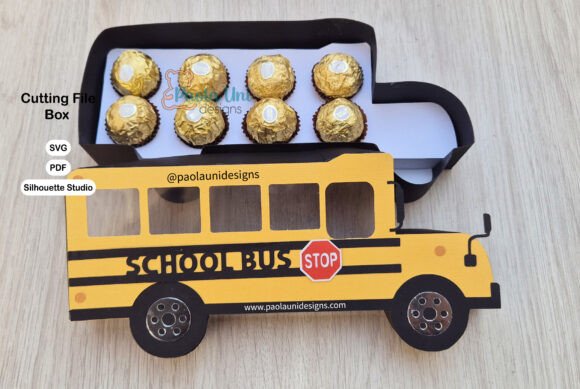
All Aboard for Creativity: Mastering the School Bus Shaped Box for Parties and Gifts
In the world of modern crafting and event planning, the difference between a standard party favor and a memorable keepsake often lies in the details. One of the most charming and versatile trends to emerge in recent years is the School Bus Shaped Box. Whether you are organizing a "Back to School" celebration, a child's birthday party with a transportation theme, or simply looking for a unique way to package homemade treats, this project offers endless possibilities. This guide will take you from the concept to the final assembly, exploring how digital files like SVGs and PDFs have revolutionized the way we create physical objects.
The appeal of the school bus design is universal. Its iconic yellow color and recognizable silhouette evoke feelings of nostalgia, excitement, and community. When transformed into a functional candy holder or gift box, it becomes more than just a container; it becomes a centerpiece of the event itself. By utilizing cutting machines like the Cricut or Silhouette Cameo, crafters can produce professional-looking results with precision that was once only possible in industrial settings.
Understanding the Digital Blueprint: SVG, EPS, and PDF Files
Before picking up your scissors or loading your cutting mat, it is essential to understand the digital foundation of this project. The core of this craft lies in the file formats provided: SVG (Scalable Vector Graphics), EPS (Encapsulated PostScript), and PDF (Portable Document Format).
Why are these specific formats important? Unlike standard image files (like JPEGs) which are made of pixels and can become blurry when enlarged, vector files like SVG and EPS are made of mathematical paths. This means you can resize your school bus box from a tiny favor to a large storage bin without losing any quality. For users of Cricut Design Space or Silhouette Studio, the SVG file is the gold standard. It allows the software to recognize distinct cut lines, score lines, and fold lines automatically.
The inclusion of a PDF Scissors File ensures accessibility for everyone. Not every crafter owns a digital cutting machine, and that is perfectly fine. The PDF version provides a template that can be printed on standard letter or A4 paper, traced onto cardboard, and cut by hand. This democratization of design ensures that the joy of creating a School bus shaped box is available to students, teachers, and parents regardless of their technological resources.
The Importance of Bilingual Instructions
Crafting is a global language, but instructions should never be a barrier. This project stands out by offering comprehensive instructions in both English and Spanish. Whether you are following the guide for a "Caja en forma de Bus escolar" or a "School Bus Shaped Box," the clarity of the steps ensures success. The bilingual approach includes specific terminology for materials and actions, such as "desagrupar" (ungroup) and "líneas de marcado" (mark up lines), making the process intuitive for Spanish-speaking crafters while maintaining technical accuracy for English speakers.
Gathering Your Materials: The Essentials for Success
To bring your digital design to life, you need the right physical components. The quality of your final product depends heavily on the materials you choose. Here is a breakdown of the necessary supplies:
- Cardboard (Cartulina): This is the structural backbone of your box. For a sturdy candy holder, choose a cardstock with a weight of at least 65lb to 80lb. If you are using a digital cutter, ensure the cardboard fits your mat. For hand-cutting, a smooth surface is ideal for tracing.
- Liquid Silicone (Silicón líquido): While glue sticks and white glue are common, liquid silicone offers superior bonding for cardboard. It dries clear, remains flexible (preventing the box from cracking at the folds), and provides a strong hold for the heavier elements of the bus design, such as wheels or windows.
- Acetate (Acetato transparente): This is the secret ingredient that makes the school bus come alive. Acetate sheets are used to create the windows of the bus. They allow guests to see the candies or gifts inside without compromising the structural integrity of the box. It adds a professional, polished look that plain cardboard cannot achieve.
- Accessories: The beauty of this project is its customizability. You can add googly eyes, ribbon pulls, or printed names to personalize each box.
Step-by-Step Assembly: From Screen to Structure
Once you have your files and materials ready, the assembly process begins. Whether you are a beginner or an experienced crafter, following a logical workflow is key to avoiding frustration.
- Prepare Your File: Open your SVG or EPS file in your preferred software (Cricut Design Space, Silhouette Studio, or Adobe Illustrator). A critical step often overlooked is to ungroup the elements in your program. This separates the cut lines from the score lines. You must select "mark on the markup lines" or designate specific lines as "score" rather than "cut." If you cut through the fold lines, your box will fall apart.
- Cutting the Materials: Load your cardboard onto the cutting mat. If using a machine, select the appropriate pressure setting for cardstock. If cutting by hand using the PDF template, use a sharp craft knife and a metal ruler for straight edges. Don't forget to cut your acetate pieces for the windows slightly smaller than the openings to ensure a clean fit.
- Assembly and Gluing: Before applying adhesive, do a "dry fit" by folding along all the score lines. This softens the cardboard and ensures the box folds correctly. Apply your liquid silicone sparingly to the tabs. Press the acetate into place behind the window cutouts first, then assemble the main body of the bus.
- Final Touches: Once the structure is secure, add your accessories. This is where you can customize to your liking and need. Add a "Route 1" sign with the birthday child's name, or fill the bus with themed chocolates.
Troubleshooting Common Issues
Even with the best instructions, challenges can arise. A common misunderstanding is regarding the score lines. Many beginners cut all the lines, rendering the box impossible to fold neatly. Remember: score lines should only indent the paper, not cut through it. Another frequent issue is the choice of glue. Hot glue can sometimes warp thin cardboard or leave visible clumps; liquid silicone is recommended for a seamless finish. If the acetate windows fog up, ensure you are handling them by the edges to avoid fingerprints.
The Broader Impact: Creativity in Education and Business
Beyond the immediate satisfaction of completing a craft project, the School Bus Shaped Box represents a larger trend in DIY culture and education. In classrooms, building these boxes can serve as an engaging STEM activity, teaching children about geometry, spatial reasoning, and following technical instructions. It bridges the gap between digital design and tangible results.
For small business owners and party planners, these designs offer a cost-effective way to create high-value products. Instead of buying expensive pre-made favors, entrepreneurs can purchase a digital file once and produce hundreds of unique boxes. The ability to customize the design allows for branding opportunities, turning a simple candy holder into a marketing tool.
Furthermore, the availability of instructions in multiple languages fosters inclusivity. It allows families from diverse backgrounds to participate in shared creative activities, strengthening community bonds through the universal language of art and celebration.
Conclusion: Your Journey Begins Here
Creating a School Bus Shaped Box is more than just folding paper; it is an exercise in creativity, precision, and joy. With the right tools—your SVG or PDF files, quality cardboard, liquid silicone, and acetate—you can transform a simple digital concept into a cherished physical memory. The included graphic PDF instructions ensure that whether you speak English or Spanish, you have the guidance needed to succeed.
So, gather your materials, fire up your cutting machine or grab your scissors, and get ready to create something extraordinary. Whether for a classroom party, a family gathering, or a small business venture, these bus-shaped boxes are sure to be a hit. Remember, the most important accessory is your own imagination. Customize, experiment, and enjoy the ride!
Ready to start your project? Download the files today and let the creativity roll!